Cymbidiums
-
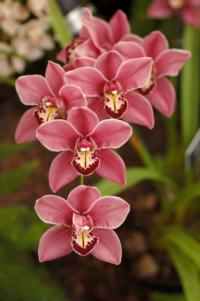
Cymbidiums are the hardiest of all orchids, with long arching foliage and spikes with from one to thirty flowers per spike. They can be grown outside in Southern California under shade cloth of 55% density, lath, or sun-limiting fiberglass.
Light
Sunlight is one of the most important factors in the growing of cymbidiums They prefer filtered sun under trees where they can get direct early morning and late afternoon light. From 10:00 am to 4:00 pm they should be shaded from direct light by one or the other methods mentioned above. Once the buds appear, they should not be exposed to direct sunlight. The best indicator of light is the color of the foliage, which should be a yellowish/green, not a deep green. Insufficient sunlight, more than any other factor, is the most usual cause for cymbidiums not blooming.
Water
Cymbidiums should be kept moist at all times. During the spring and summer months (April to October) plants should be watered at least twice a week. Watering schedule should be dictated by the medium used. Watering systems vary from hand watering with a hose, to automatic individual “spitters” or overhead sprinklers. All systems have their own advantage. Leaf tip die back and bud shrivel are two telltale signs of insufficient water. During fall and winter months (October to April), watering will usually be once a week, depending on the medium. Plants should never be allowed to become bone dry. Plants should never stand in water. Good drainage is a must.Humidity
Methods of increasing humidity vary from individual humidity trays, to pie pans with gravel or sand, to wetting down the gravel on floor of a greenhouse or overhead misting systems. Cymbidiums like about 40% humidity.Fertilizer
Kinds of fertilizers and fertilizing schedules are as varied as the colors of cymbidiums! Most commonly recommended foods are an even 20-20-20 to be used year round, or with every watering, or a high nitrogen 30-10-10 from July through November and a low nitrogen 15-30-15 from December through June. If you don’t care to fertilize every time you water, a controlled-release fertilizer with or without micronutrients may be applied twice a year, once in the fall and once in mid-spring after repotting. Most orchid foods have recommended dosages and schedules. You must find the one best suited for you.Growing medium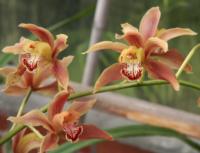
Mediums range from pure fir bark to blends of all kinds, with the addition of redwood chips, perlite, oak leaves and many others. Again, you will need to find one that is best suited for your particular needs. Whatever your mix, bear in mind that the drainage must be very good, as cymbidiums will not tolerate standing water around their roots.In general a good basic mix is comprised of:
1/3 - orchid bark (1/8 to 1/4 fir bark)
1/3 - coarse horticultural charcoal
1/3 - #3 perliteTemperature
Cymbidiums prefer a twenty to thirty degree spread - from 55° to 85°F, but are capable of handling temperatures in excess of 100° and below 35°F as long as exposure to these temperatures is not prolonged. This is the main reason that they are such excellent plants for indoor and outdoor habitats. It is necessary to expose cymbidiums to night temperatures of at least 50° to 55°F from late summer to early fall to initiate spikes. Once spikes have set, temperatures should not fall below 40°F to ensure no spike loss. The higher the temperature the plants are kept after spike set dictates how soon they will bloom. Too much heat however, may cause premature blooming, smaller flowers, and shorter spikes.Bulbs and Foliage
As long as the center leaf of a bulb is still alive, the bulb is still growing. Bulbs with no foliage are called back bulbs. Back bulbs are storehouses of food and plants. As long as back bulbs are a part of the mother plant they will remain dormant. But if removed, new growth may perhaps be initiated. Front bulbs, or green bulbs, are the bulbs with foliage, and will retain their leaves for at least two years before becoming back bulbs. Adult green bulbs initiate new growth and flower spikes.
Dividing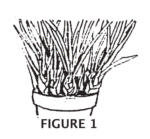
The plant illustrated in Figure 1 has just finished blooming. The pot is filled with bulbs with no room left for new bulb growth. You can either shift this plant on without dividing, or divide as shown in Figure 2. If the plant is not blooming, the best time to divide is in March. If blooming, May is best, as soon as blooms are cut. Do not divide after July 1 as this will usually prevent blooming the following year.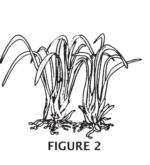
Figure 2 shows how the division will be made. When separating the plant into blooming size divisions, keep a minimum of 3-5 bulbs in a division. The dormant, leafless bulbs, called back bulbs, may be removed to be restarted by planting in a cymbium mix to 1/3 of their depth. Large divisions are advisable if all bulbs are strong and have leaves and roots. It takes a goodsized, well established plant to produce the best flowers. Do not remove a back bulb if it holds two green bulbs together.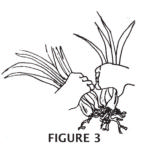
Before dividing, wash or shake as much old potting mix off the roots as possible. Examine plant to see where separation can best be made. Firmly grasp the lower portions of the bulbs and vigorously pull them apart as illustrated in Figure 3. Pruning shears, sterilized by flaming, will help in severing the rhizome, which joins the bulbs at their base. Clean old mix from around roots, remove any dead roots.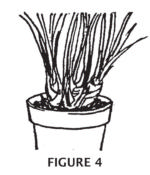
Figure 4. Place newly divided Cymbidium divisions into a pot or tub large enough to contain them for 2-3 years. Make a mound of mix in bottom of pot. Spread roots over mound. Pot the growths and bulbs to 1/3 of their depth. Firm mix about roots being careful roots are not balled into center of pot, but spread well throughout mix. Work mix in well around roots. Water once to settle the mix around the roots. Place plant temporarily in well-shaded, humid location and frequently mist foliage. Do not water for two weeks. This dry period allows cuts or fractures to heal over. When active root action shows, normal lighting, food, and watering can be resumed.
Common ProblemsWarning signs and possible causes for some of the problems commonly seen with cymbidiums:
1. Leaf tip die back
- Insufficient water
- Salt build-up in potting mix
- Over-exposure to light2. Bulb Shrivel
- Insufficient water
- Insufficient food
- Possible disease or infestation3. Bud Drop
- Over exposure to light
- Possible disease or infestation
- Drastic temperature change4. Flower Spot
- Insufficient air movement with too much humidity
- Pest infestation
Aphids
Tiny green, white, yellow or pink insects; sometimes winged. Live and feed in colonies on young growth, buds or flowers. Stunt plant growth. Some excrete honey dew; spread disease.
Treatment: Hose off with spray of water. For more stubborn infestations spray with an insecticidal soap. Read more about management of aphids.Mealybugs
Small white cottony immobile insects. Form colonies at stem joints, near base of leaves (usually on underside), in young growth and under bracts.
Treatment: Hose off with spray of water. For more stubborn infestations spray with an insecticidal soap or with a 70% isoprophyl alcohol and wipe off with a cotton pad. Read more about management of mealybugs.Scale
Small insects in colonies attached to stems, leaves, bulbs and rhizomes. Generally covered with protective shell. Can spread fast, often moved by ants.
Treatment: Spray plant entire plant including undersides of leaves with a fine oil spray following directions on label. Repeat in 7 days. Make sure plant is well watered before spraying. Read more about management of scale.Red Spider Mites
Worst of summer pests. Finely stippled leaves with silvery webs on underside. Need hand lens to actually see them, or drag a white tissue over suspected leaf and a red smear should appear.
Treatment: Same as for scale, using fine oil spray. Read more about management of red spider mites.Snails and Slugs
Most common destructive pests. Feed nights and cool days; hide on warm days. Leaves silvery slime trail.
Treatment: Iron phosphate bait placed around pots and/or around bulb carrying flower spike. Read more about management of snails and slugs.
Blackened Leaf Tips
Blackened area extends from tip of leaf downward, caused by excess salts in water. On cymbidiums, cut off leaf tips with flame sterilized tool.
Preventative Treatment: Flush pot with water periodically to help prevent salt build up.Viruses
VERY hard to diagnose. Commercial test kits for diagnosis are available by mail. In general, virus shows up in the leaves as white stripes, where chlorophyll has been killed. Flowers show mottled appearance. Spread by mechanical means, such as through non-sterilized cutting tools, pots or by touch.
Treatment: isolate or destroy infected plant. There is no cure. To prevent, always sterilize cutting tools by flaming, don’t re-use pots that have not been sterilized, and change gloves from plant to plant when re-potting.


